
DIY Wine Cork Pumpkin Craft For Fall
I may have been compensated for this post. Please keep in mind that it affects you in no way financially. If an item is being reviewed, I am not obligated to give a positive review and always use my own words. This disclosure is in accordance with the Federal Trade Commission’s 16 CFR, Part 255: Guides Concerning the Use of Endorsements and Testimonials in Advertising. If you would like a review done contact Dannelle at op40k@aol.com
The fall season is here and it is time to think about the perfect addition to your seasonal fall decor! This fun wine cork pumpkin craft could be just the ticket: our simple wine cork pumpkins are not only easy to make but very budget-friendly if you have a great source to collect a number of corks.
Yes, you can buy craft wine corks if you don’t get enough wine corks from your own home, but a great way to get old wine corks is by checking in with your favorite restaurant or local wine bar. The next time you are there and having that glass of wine, you can inquire as to what they do with the corks when the bottles are empty – if they would save them for you or now. Granted, it might not be too much fun to drink all that wine yourself, so this might help you stock up and upcycle what might normally be put in the trash.

If worse comes to worst, you can usually find corks in your local craft store or on Amazon. https://amzn.to/3AQ8zD0
Now, let’s get to our fun wine cork pumpkin project!
Wine Cork Pumpkin Tutorial
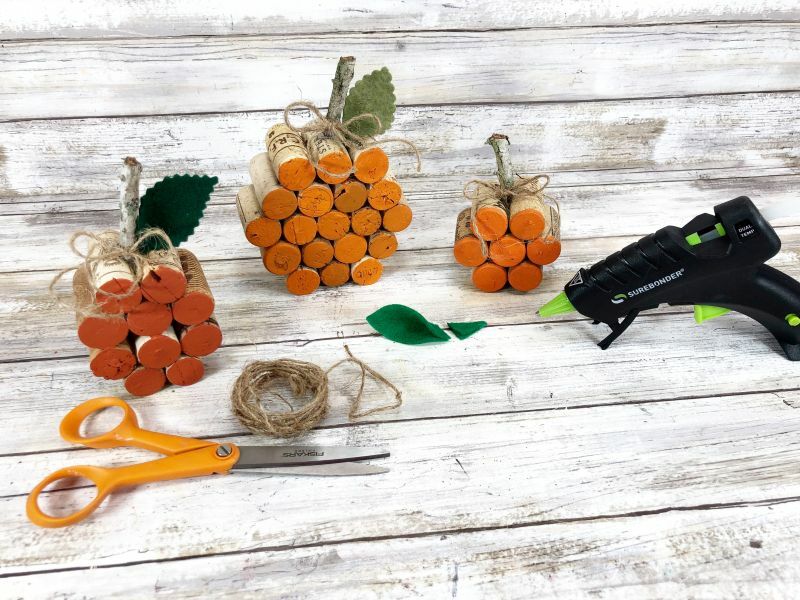
Put those recycled wine corks to good use in your Fall home décor, creating a trio of pumpkins in a variety of sizes. These cuties go together in just about 30 minutes with limited supplies.
Supplies you need to make your cute wine cork pumpkin set:

- Lots of Wine Corks
- Orange Acrylic Paint For Crafts – Three Different Shades of Orange
- Assorted Felt Scraps – Greens
- Natural Jute Twine
- Twig – From the Yard
- Hot Glue Gun and Glue Sticks
- Scissors
- Paint brush
- Wire Cutters or Branch Cutter

Wine Cork Pumpkin Directions:
STEP ONE
To begin the Wine Cork Pumpkins, gather all supplies. For the small pumpkin, attach two corks, three corks, and two corks with a glue gun and glue sticks.

Glue the corks together in rows with a dab of hot glue. Stack and secure two corks on the bottom, three corks for the middle row, and two corks on the top with a glue gun. If using liquid craft glue hold corks together with a rubber band during the drying process of each cork layer.
STEP TWO
For the medium pumpkin, attach two corks, three corks, three corks, and two corks again for the top of the row with a glue gun and glue sticks.

Glue the corks together in rows. Stack and secure two corks on the bottom, three corks on the second row, three corks on the third row, and two corks on the top.
STEP THREE
For the large pumpkin, attach three corks, four corks, five corks, four corks, and three corks with a glue gun and glue sticks.

Glue the corks together in rows. Stack and secure three corks on the bottom, four corks on the second row, five corks on the third row, four corks on the fourth row, and three corks on the top row.
STEP FOUR
Place three shades of orange craft paint on a paper plate. One light, one medium, and one dark. Paint each cork pumpkin with a bit of orange paint using a paintbrush – just the ends of the cork. That is what will make the front of the pumpkin really pop!

Paint the small pumpkin light orange, the medium pumpkin dark orange, and the large pumpkin with the medium orange. You could also leave the pumpkins the natural cork color.

STEP FIVE
It is time to make the top of your pumpkin! Gather a tree branch from the yard. Cut one-inch to two-inch sections with a pair of wire cutters or branch cutters.

Attach a stem to the top center of each cork pumpkin with a glue gun and glue sticks. You could also use a section of wooden dowel for the stems.
STEP SIX
Now the next step: cut out leaf shapes with scissors, pinking shears, and scallop shears from three shades of green felt. You can also use scraps of green fabric or paper.

Apply a bead of hot glue at the tip of each leaf and fold it in half. This creates dimension. Attach to the side of the pumpkin stem with a glue gun and glue sticks.
Now, wouldn’t that look splendid on your Thanksgiving table? Who knew old corks could create such a fun craft?
Quick and easy to make for family, friends, co-workers, or even the kids’ teachers. Your family and friends will never know how quick and easy this trendy Recycled Wine Cork Pumpkin Trio was to create!

DIY crafts with wine corks:
- Wine Cork Nutcracker
- Wine Cork Turkey Craft
- Wine Cork Christmas Tree
- Wine Cork Wreath Ornament
- Wine Cork Utensil Holder
- Wine Cork Christmas Tree
Other fall ideas to try:
- Stacked Pumpkin Mix Pie is a Perfect Fall Treat
- Home Improvement Projects You Need to do This Fall
- 30 Awesome Fall Pumpkin Recipes to Try
- 6 Deep Cleaning Tasks to do This Fall
- Fancy Fall Acorn Cookie Recipe